Showing posts with label Recipes. Show all posts

Sunday, June 03, 2012

Chilli chicken with gravy recipe

I love Chinese food, or rather I love Indo-Chinese food, and chilli chicken is one of my most favourite dishes in this cuisine. 
If you grew up in the 90's and early 2000's in Mangalore, then Hao Hao is one of the places you would have frequented for Chinese food and most often than not, you would have ordered that delicious plate of chilli chicken!!!


Ever since I moved to Mumbai, I missed that Hao Hao chilli chicken. No matter how many restaurants we tried, it was never as delicious as the chilli chicken of Hao Hao.

Finally I decided to make it myself. After searching online and discussing with my friends, I finally made it today and must I say, the chicken was as succulent and tasty as the HH one. 

 
For the dish, boneless chicken needs to be marinated in little vinegar and some salt for 10-15 minutes. Then make a batter of beaten egg, 2 tbsp of maida and cornflour each, some grated garlic and some salt to taste. Dip the marinated chicken pieces in this batter and deep fry on medium flame until golden brown. Dont overcook it as it may make the chicken pieces hard. Drain and keep aside.

Make a gravy of your choice. I made a simple gravy with all the sauces.
In the same oil used to fry the chicken pieces, add a tbsp of chopped garlic, onion slices, sliced capsicum and some slit green chillies. Fry on high heat to allow them to remain crunchy. Make a mixture of soya sauce, red chilli sauce, tomato sauce, and some vinegar. Add it to the pan and when it starts to bubble, add a mixture of cornflour and water. Allow the gravy to thicken and then add the fried chicken pieces. Mix well and then cook covered for a couple of minutes so that the chicken pieces can absorb the gravy. Adjust salt as per taste. Remember, the sauces have salt in them already. Serve hot.

Friday, May 04, 2012

Walnut halwa

Walnuts, known as Akhrot in Hindi, are very nutritious and one of the commonly available dry fruits here. You are read more on walnuts here.

I am not very fond of walnuts, but my husband loves them. I can eat them along with other dry fruits, but never walnuts alone. Last year, at a dinner party, we tasted a new dessert, walnut halwa. It was a cold winter night and the warm halwa tasted awesome!

Today, being my husband's birthday, I decided to make this halwa. I had a whole lot of walnuts in my kitchen and luckily this recipe calls for very few and common ingredients.


Ingredients: Walnuts 1 & 1/4 cup ground coarsely
                   Ghee 1/4 cup
                   Sugar 1/2 cup
                   Milk 1 cup
                   Cardamom powder 1 tsp


Heat ghee in a thick bottomed pan and fry the coarsely ground walnut powder in it until lightly brown and the ghee starts to separate. Add the milk and cook the walnut mixture on medium flame, stirring occasionally, taking care to see that it does not get burnt. Cook for a couple of minutes and then add sugar. Mix well and cook on low flame and allow to thicken to desired consistency. Garnish as desired and serve hot.

Note: For the health conscious, the amount of ghee given in this recipe can be reduced slightly. I drained off the layer of ghee that appeared on top of the halwa.

Sunday, August 21, 2011

Happy Janmashtami!


Today is Krishna Janmashtami or the celebration of Lord Krishna's birth.  We had a small pooja at home today.


Prepared Panchakayi or Panchakajjaya which is a sweet offering made of five ingredients. Here's the recipe:

Coconut gratings - 1/2 cup
Jaggery - 1/2 cup
Moongdal - one fistful
Chanadal - One fistful
Black til - 1 tbsp

Wash the dals separately as well as the til. Heat a pan and dry roast the dals separately until they turn reddish or brown. Take care not to burn them. Keep aside. Once cooled, coarsely grind both the dals. Dry roast the til too until it starts popping. Keep aside. In the same pan, add the jaggery and allow it to melt and cook on a medium flame. When the liquid jaggery becomes slightly thick, add coconut and fry until it mixes well. Remove and cool. Add the dals and the roasted til. This is offered to Lord Krishna.   

Sunday, June 05, 2011

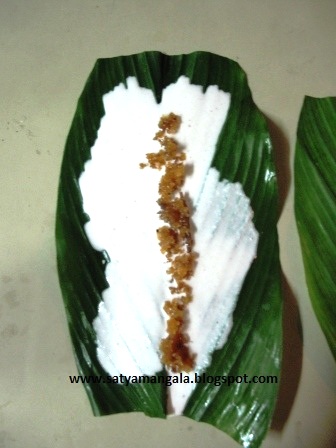
Haldi paan patholi / sweet dumpling on turmeric leaf

Haldi paan patholi or sweet dumpling on turmeric leaf is a Konkani delicacy. The turmeric leaves used to make these dumplings infuse its aroma into the dish. Though this dish can be made using banana leaves in stead of the turmeric leaves, the end product is not as flavoursome.


Patholi has an outer covering of rice and coconut ground together. Inside it lies the sweet coconut stuffing made with jaggery and richly laced with cardamom.

Ingredients: This makes 21 patholis.

Outer covering:
Rice - 250 g (soaked for an hour)
Coconut - 2-3 tbsp freshly grated
Salt to taste.

Grind the rice and coconut together to make a fine paste, slightly thick, dosa-batter consistency. Mine turned out to be a little thinner and flowing.


For the filling:
Jaggery - two lemon-sized.
Coconut - 1 cup
Cardamom - 10 finely powdered.

      Firstly, melt the jaggery on a medium flame. Take care not to burn the jaggery. You may sprinkle a few drops of water to avoid burning. Cook it until a string  forms when you press the melted jaggery between your thumb and your finger.

 Then add the coconut. Mix well and cook until the coconut and the jaggery form a gooey mass together. Then add the cardamom powder.


                                                    Turn off the flame and cool.

Wash the turmeric leaves and wipe them dry.

Trim both ends of the leaves and lay them on a flat surface.

Now streak the leaf with a ladleful of the batter.

Next, add a thin line of stuffing along the middle of the leaf.

Fold the leaf  into half along the length and place them into a steamer and steam for 10-15 minutes (until the leaves change colour).


Peel away the leaves and serve hot with ghee.


Wednesday, May 04, 2011

Happy Birthday, Hubby Dearest!

Today is my husband's 30th birthday!! Last weekend we threw him a surprise party and I baked a cake for him.

This cake was the same recipe that I had posted earlier. This time, I used an aluminium pan to bake the cake and the cake was baked to perfection in 35 minutes. Also it baked evenly. The only problem this time was that it was too hot in the kitchen when I tried to decorate the cake and all the whipping cream started melting off. Finally after cooling it in the refrigerator for a couple of hours, did it set a little and looked better. All in all we all enjoyed the cake. It tasted even better the next day as it had soaked all the juice.  Must say, this recipe is for keeps....and this husband too....I sure am very very lucky to have him in my life!! Once again, wish you a very happy birthday, my love!

Sunday, May 01, 2011

Kadgi Chakko - Jackfruit side dish

Kadgi chakko is a side dish using tender raw jackfruit. This is a traditional Konkani dish and a favourite of most Konkani people. My husband who was earlier always wary of eating jackfruit, loves this dish and in the months of summer, when tender jackfruit is available in the market, this dish is a regular at our place. So here's the recipe.


Ingredients:
Tender jackfruit - 1/2 kg
Grated coconut - 1 cup
Red chillies       -7-8 (as per taste). This dish needs to be slightly spicy.
Tamarind
Urad dal           - 1tbsp
Mustard           - 1 tsp
Fenugreek (methi seeds) - 1tsp
Salt to taste

The jackfruit should be tender, where the seeds are soft and without the flaky outer white skin. Cut the jackfruit into medium-sized chunks.


Now, cook the jackfruit pieces in salted water until cooked but firm. You can pressure cook it too. Traditionally the jackfruit is cut into long strips and after cooking, the jackfruit is pounded  into smaller pieces.
Once cooked, lightly pound the jackfruit, so that the masala gets infused into it.

For the masala, grind together coconut, red chillies, and tamarind into a coarse paste until as little water as possible. Fry the urad dal in a tsp of oil, until brown and fragnant. Add it to the ground masala and grind it for another 20-30 seconds in the mixer. Keep aside.

In a pan, add 1 tbsp of oil. Add mustard and methi seeds. When they splutter add the ground masala, a little water, and cook until the raw smell goes off and the water dries up. Then add the cooked jackfruit and a little salt. Mix well and cook covered on a slow flame for another 5 minutes. This makes a great accompaniment to dal and rice.

Tuesday, March 15, 2011

Accidental chocolate cookies!


Accidental chocolate cookies! Strange name, na?? But I made these cookies by accident. Some may say trial and error. But it was neither a trial for cookies, nor can I call the end result as error! Well here's the story: Last week, a friend of mine gifted me some awesome homemade chocolates. They were soo very good, that I was inspired to make some myself. I remembered that I had some cooking milk chocolate which I had bought earlier. So I cut a big chunk of it, around 100 g of it and placed it in the microwave to melt it. This being my first time with melting the chocolate, I realized that the chocolate had caramelized a little, very slightly. So I quickly removed it, added some milk to it to make a gooey mass, and then added some nuts and sultanas to it. I was hoping that it would set when cooled, but after 10 minutes of cooling, I realized that it was still just a gooey mass though very tasty. Instead of eating it just like that, I decided to experiment a little. I sifted some all purpose flour with 1 tsp of baking powder and added it to the chocolate mixture. I mixed it well. Added a couple of drops of cooking oil to it and made a smooth uniform mass. My confidence regained, I made small balls of this mixture, flattened into a cookie shape, and placed in on a baking sheet. Then I baked it in a preheated oven at 200 degrees C for 14 minutes. When the kitchen was filled with a heavenly chocolatey aroma, I new that I had not lost my way in saving the chocolate!! I removed the cookies from the oven, cooled them and hesitantly bit into one.....and it was GREAT!!!!!!!!!!!!!!!!!!!!! It was light and crunchy, may be not as crunchy as a butter cookie, but definitely crunchy enough to be relished.

So here's the recipe:

Milk chocolate - 100 g
Milk - 2 tbsp
All purpose flour - 100 g
Baking powder - 1 tsp
Cashew nuts - 1 tbsp
Sultanas - 1 tbsp
Oil - 1 tsp


Method: Melt the chocolate using a double boiler or in the microwave, taking care to see that it does not burn or caramelize. I heated it in the microwave at 50% power for 1 minute. Add the milk, nuts, sultanas. Mix well. Sift together all purpose flour and baking powder. Add this to the chocolate mixture and mix well. Add the oil and knead lightly to make a smooth dough. Take small balls of dough, flatten them like a cookie and place on a baking sheet. Bake in preheated oven at 200 degrees C for 14-15 minutes. Check with a tooth pick to see if cooked well. Remove and allow to cool. Makes around 15 cookies. The cookies tend to be soft when hot, but become crunchy when cooled. You can also microwave them for a minute and then cool. They become very crunchy.

So, I have learnt two things today:
1. It is not easy to melt chocolate.
2. Failure is the stepping stone to success.

Monday, March 07, 2011

Crispy karela (bitter gourd) in microwave


Firstly, for all those who have been wondering as to why I have not posted any new pictures in my crochet album, here's the situation. Apart from a bad bout of cold and fever, recurring shoulder pain, and a wonderful vacation which occupied a major chunk of my time last month, I have been busy doing repeat orders for some of my bags which I have posted earlier in my blog as well as my album. People who place orders for bags, seem to love the colour combination I have used, and request for the same pattern and same colour combination. So it makes no sense in me posting the pics over and over again. Some of my patterns, I have repeated so many times, that I won't be surprised if I end up doing some crochet with my eyes closed or even in my sleep!!

Apart from crocheting and other crafts, I like to be creative with food. So lately all that I have blogged about is food, mostly healthy, low-fat, guilt-less food. So here's another such recipe which I have made quite a few times earlier but posting only now - crispy karela (bitter gourd) in microwave.

My husband is very fond of bitter gourd, especially fried bitter gourd, and I enjoy it too. Since we both love to eat and both have a tendency to put on weight easily, I am always on the lookout for healthy recipes so that I don't have to abstain from eating something which I like. I believe in eating in moderation where as my hubby dearest believes in no moderation when it comes to food that he loves. Sometimes I wonder if I put on weight merely by taking in the smell of good food or even glancing at it!! So for all good reasons, here's something that I would like to share with anyone and everyone who likes bitter gourd.

Ingredients:

Bitter gourd thinly sliced - 1 cup
Chilli powder - 1 tbsp
Gram flour (besan) - 2 tbsp
Salt - as per taste
Hing (asafoetida) - 1 tsp
Oil - 2 tsp

Mix all the ingredients together and keep aside for 10-15 minutes.

Place the slices in a single layer on a greased microwave safe plate and microwave on high for 6 minutes. Turn over the slices and once again microwave on high for 6 minutes. You can continue to microwave for a minute or two more if the slices are not crispy enough.

Friday, March 04, 2011

Brinjal rava fry in microwave


Mangalore brinjal or Gulla as it is commonly known in Mangalore, is a tastier variety of brinjals. Read about the brinjals here.

Many delicacies are made from these brinjals, among which I enjoy the deep fried ones the most. There are two ways to prepare the deep fried ones. One, is to dip the brinjal slices in gram flour batter and deep fry them. The second method is to marinate the slices in spices and then roll them in semolina or rava or sooji and then deep fry them. The rava fry can also be made as a shallow fry. This time I tried it in microwave. It is easy to make, takes less than 10 minutes and is also healthy.

Ingredients:

Gulla/brinjal slices - 10 no.
Chilli powder - 2 tsp
Salt - as per taste
Turmeric powder - 1 tsp
Asafoetida/hing - 1 tsp
Rava/sooji - to roll the slices
Oil - 2 tbsp

Mix all the ingredients except rava and oil and keep aside for 10 to 15 minutes.
Then roll the brinjal slices in rava and place on a greased microwave safe plate and microwave on high for 3 minutes.
Brush the slices with oil, turn them over. Drizzle a little oil on top of the slices and again microwave on high for 2-3 minutes. Check if cooked.
Serve hot.

Note: The slices shrink a little when ready. Make the slices of medium thickness, neither too thick nor too thin.


Thursday, February 17, 2011

Spicy squid

Although I have tasted, relished and enjoyed squid earlier, this was the very first time I was preparing a squid dish at home. It is very easy to clean the squid. Please check this for the step-by-step instructions on how to prepare the squid before cooking. 

Squid 

Squid cleaned, washed, and cut into rings
The quill found inside the squid, can be easily mistaken for a piece of plastic


Spicy squid curry

Spicy squid curry:


Ingredients: Squid - 1 cup
                     Onion - 1 big
                     Tomato - 1
                     Ginger - garlic paste - 2 tsp
                     Chilli powder - 1 tbsp
                     Turmeric powder - 1tsp
                     Garam Masala powder - 2 tsp
                     Salt to taste
                     Oil - 2 tbsp
                     Curry leaves - 5-10
                     Green chillies - 3-4 slit
                     Coriander leaves for garnish.

Mix together squid, ginger-garlic paste, chilli powder, turmeric powder, garam masala powder, and salt. Mix well and leave aside for 10-15 minutes.
In a pan, heat oil. Add chopped onion, curry leaves, green chillies. Fry till the onion becomes tender and golden in colour. Add the chopped tomato. Fry for a couple of minutes until oil starts to separate. Then add the marinated squid. Mix well. Add water only if necessary. Cover and cook on medium flame for 10 minutes or until cooked. Garnish with chopped coriander leaves.

Note: The quantity of the powders can be adjusted as per taste. Water can be added to have more gravy.


Thursday, February 10, 2011

Little hearts of cumin and pepper!


Recently I came across this recipe on Sunita Bhuyan's website. An easy-to-make recipe of savoury cumin cookies. As usual I tweaked the recipe a little. Instead of the 2 cups of plain flour mentioned in the recipe, I used 1 and 1/2 cups of whole wheat flour and 1/2 cup of plain flour. I also added 1 tsp of freshly ground pepper. I left out the sugar completely. So overall a healthier cookie. The recipe asks the cookies to be baked for  20-25 minutes, but in my oven (Samsung convection), the cookies were ready in 15 minutes. So keep checking your cookies lest they burn. These are not melt-in-your-mouth cookies as there is no butter used. These are rather crispy, crunchy cookies, a great snack with a hot cup of coffee. 

Thursday, January 27, 2011

Baked Nippattu


Nippattu is a deep fried snack, very popular in South India. We all love nippattu, have made it a couple of times in the traditional way, but it is always so oily; so I was searching for recipes online but all of them included onion and maida. I did not want any with onion (especially with the high price of onions now) nor with maida as it is not healthy. I wanted to make it as healthy as possible as my husband loves snacks like these. So instead of stopping him from eating them, I prefer to make the snacks healthier so that he can enjoy these snacks with me worrying about the calories ( no, my husband does not believe in worrying about calories at all). So I decided to try something on my own. I tweaked a recipe which I had used earlier to make the crackers and the results were great.

Ingredients:
Rice flour - 1 cup
Oats flour- 1/2
Wheat flour - 1/2
Chilli powder - 1 tbsp or as per taste
Fresh coriander leaves - 1 tbsp
Roasted chana dal/dalia - 1/4 cup
Salt to taste
Baking powder - 1 tsp
Baking soda - 1 tsp
Olive oil - 1/4 cup
Milk to bind the dough

Mix all ingredients together except the milk. Mix well to form crumbs. Then add the milk a little at a time. You may also add water if you want to bind the mixture together and form a smooth dough. Add a few drops of oil on the dough surface and knead a little more. Make small balls of the dough. Keep the balls please two baking sheets and press down to make flat discs. Bake these discs at 180 degree C for 12-15 minutes or until crisp and slightly brown at the edges. Cool and store in an air-tight container.

Monday, January 24, 2011

Whole wheat baked cracker


My family is very very fond of fried snacks like banana chips, murukku etc. Though I enjoy making them, I  prefer not to make them too often for health reasons.  So my husband would then buy fried stuff from the market which is very tasty but then again not good for health. So I was in search of a recipe for wheat crackers. Since I did not get one recipe which I liked, I decided to just try something on my own. A simple recipe but the end result was greattttttt!!!

Recipe:
Ingredients:  Whole wheat flour - 1 cup.
                         Salt to taste
                         Chilli powder - 1 tbsp (optional)
                         Milk - 1 cup.
                         Kasuri methi - 1 tbsp (optional)
                        Oil - 1/2 tbsp

Sift the wheat flour and salt.  Add the chilli powder and kasuri methi.  Add the milk a little at a time to make a soft dough. Add the oil and knead the dough until it has a smooth surface.  Leave aside for 15 minutes. Preheat the oven at 180 degrees C.  Make lemon sized balls of the dough and roll them out in a thin round. Use biscuit cutters to make the desired shape. Place on  baking sheet and bake at 180 degrees C for 8- 10 minutes or until crisp and slightly brown.

Even plain crackers without using chilli powder or kasuri methi, tastes equally good. You may also add other flavouring agents like Italian herbs or dhania-jeera powder.

A couple of days ago as I was browsing other recipes blogs, I came across www.priyaeasyntastyrecipes.blogspot.com and she has a similar recipe using oatmeal. I tried that recipe and it turned out great too. In fact it was soo good that I had only four crackers left to click a picture for this post. My husband was ready to pounce on it the minute I finished clicking the picture.  So make sure to make a big batch of these crackers.  

Sunday, January 23, 2011

Low oil murg kali miri tikka

Since long I have been wanting to try making tikkas at home. This is my first attempt with chicken and it turned out awesome!!


Ingredients: Boneless chicken 500g diced
                      Pepper - 2 tsp or as per taste, freshly ground.
                     Capsicum - 2 diced                
                     Onion - 1 big
                     Ginger - 1 inch
                     Garlic - 1 pod
                     Green chilli - 2-3
                     Garam masala - 1tsp
                     Hung curd - 2 tbsp
                     cornflour - 1 tbsp
                     Egg - 1
                     Salt to taste
                     Turmeric powder - 1 tsp
                     Oil - 1 tbsp

Heat oil and fry onions until brown. Cool and grind to a fine paste with little water.
Grind together ginger, garlic, and chillies.
Mix the chicken with the onion paste, ginger, garlic and chilli paste, and rest of the ingredients.
Set aside to marinate for 2-3 hours.
Preheat oven to 180 degrees C.
Arrange chicken and capsicum on  skewers and place on a greased microtawa. Cook in the preheated oven for 12 minutes. Keep rotating the skewers in between.  Do not overcook  chicken as it becomes chewy and dry.  Serve hot with pudina chutney.

Pudina chutney:
Ingredients: Pudina/mint - 1/2 cup
                       Coriander leaves - 1/2 cup
                       Green chillies - 2-3
                       Ginger - 1 inch
                       Curd - 2 tbsp
                       Salt to taste.
                       onion - 1 medium

Grind together all the ingredients.

Do make a big batch as this tikka disappears within seconds!!

Monday, January 03, 2011

The humble PAV!

If you have lived in India, you would have definitely heard of Pav Bhaji, if not tasted it. If you have lived in Mumbai, you would have definitely enjoyed tucking into a plate of hot Bhaji topped with some melting butter, chopped onions and coriander leaves, accompanied by the slightly toasted humble pav.  Another great snack with this humble pav is the vada pav which is the staple food for many Mumbaites. I have always been intrigued by this Pav or bread, which has a nice crusty surface but so soft and cottony inside. As I was in the mood for some baking yesterday, I was surfing for some easy baking recipes. I chanced upon this website, www.chefinyou.com which had this recipe for dinner rolls or the pav. Immediately I set to work and within a couple of hours, we were tucking into just-out-of-oven pavs and our kitchen was smelling heavenly with the baking aroma.  The pavs were just great!!! I am just an amateur baker, but still the end result was great all thanks to the recipe. Do give it a try.

I halved the pavs and slightly toasted them on a tawa and served them with bhaji this morning. The pavs disappeared in no time! 

Sunday, December 26, 2010

A Fruit Cake

Our colony which is predominantly a Catholic one,  the air is filled with heavenly aromas of baking cakes, cookies, pies, etc. I decided to bake a cake today. This was the first time I was trying my hand at decorating the cake with icing n all, but luckily it turned out great! It was a very tasty cake, a recipe which I got from here. Do give it a try. The cake was really really moist and flavoursome.
Of note, it took me about an hour to bake this cake. Almost at my wit's end on finding the cake uncooked after the suggested 35-40 minutes of baking, it finally baked to perfection after almost an hour.


Sorry for the amateurish icing. Tried it for the very first time.

Yesterday was a dear friend's birthday and since he was visiting us today, we decided to get him to cut this cake. Had a great Sunday afternoon with friends and this yummy cake. Will surely make it again :)

Monday, December 13, 2010

Spicy macaroni and corn on toast!

Yesterday, I decided to make something different for breakfast. Something out of the ordinary. So I decided to make a macaroni and corn toast. Here's the recipe.


Brown bread : 8 slices
Sweet corn: 1/2 cup, boiled
Macaroni: 1/2 cup, boiled
Oregano : 1 tsp
Onion: 1 medium
Tomato: 1 medium
Ginger garlic paste: 1 tsp
Green Chillies: 2 (depending on your taste)
Cheese for garnishing

Grind together onion, tomato, and green chillies. Heat olive oil in a pan and add the ground paste. Fry for a couple of minutes. Then add the ginger garlic paste. Continue frying until the raw smell goes off. Then add the macaroni and the corn and mix well.  Next add the salt and the oregano. Mix well and allow to cool.

Take a slice of brown bread. Top it with the macaroni and corn mixture. Cover it with grated cheese and grill it for 5-6 minutes, until the cheese melts and gets a slightly brownish tinge to it. Serve hot. The toasts disappeared within minutes!

Last night I made another cellphone pouch, a simple one with shaded yarn.


It took me just a couple of hours to complete this one!

Thursday, November 04, 2010

Happy Diwali and 50th post

First of all, a very happy Diwali to you and your loved ones! May this Diwali shower light, happiness, and prosperity in all our lives. Today is Naraka Chaturdashi. This day celebrates Lord Krishna's victory over the demon, Narakasura.  Today, for us Konkanas, it is a day when the ladies and the children of the family have oil bath in the evening, after sunset. The ladies of the house perform pooja of the well, which is the water source, with flowers, aarti, and agarbathi (incense sticks). These days since it is hard to find wells, pooja is performed of the main water tap in the bathroom. Later, kids make noise by banging on steel plates with steel spoons. This is a tradition and it is believed that the noise keeps away bad spirits. Then small earthen lamps are lit and arranged near the doors, windows, and practically every corner of the house. After the pooja, ladies and children apply coconut oil over their bodies and have hot water bath. The traditional bathroom with the big pots of brass which are used to heat the water, acts as sauna. The steam inside the bathroom which is produced from the hot water and the wood used to heat the water, helps to detoxify the skin and makes it soft and radiant.  The coconut oil also makes the skin supple and leaves it soft and glowing. This is the only day of the year when women are allowed to have head baths in the evening, which is otherwise considered a bad omen.  I really miss the traditional bathroom and the geyser-heated water is no comparison to the hot water heated in the brass pots. After the hot bath, ladies and children dress in new clothes and then have a nice dinner with rice, fried fish and onion thambali.  This dinner is again a tradition which has been followed over the years. Primarily, fish such as King fish and  pompret are the main choices for this day. Men of the family have their hot baths the next morning.

Recipe for onion thambali:

Ingredients: Coconut grated 1 cup
                  Red chillies 2-3
                  Tamarind a small piece
                  Onion - 1 finely chopped
                  Green chillies 2-3 finely chopped
                  Salt to taste

Finely grind the coconut, red chillies and the tamarind with a little water. Add the chopped onions and green chillies and the salt. This makes a great combination with rice and fried fish. The consistency is gravy-like and this dish is not boiled.

This is my 50th post. In the last three months, blogging has become a very integral part of my life. Thanks to all my readers who have read my posts and encouraged me and motivated me. I hope to keep blogging and to hear your wonderful comments regarding my posts. Thanks one and all and once again, a very happy Diwali!

Friday, October 22, 2010

Home-made flat noodles

A couple of days back, when I was watching the contestants of Masterchef Australia make pasta, I was wondering if I could make noodles at home. I decided to give it a try. I googled for the recipe but most of the recipes asked for eggs. I wanted to make an eggless variety. So after browsing a little, I decided to experiment and used the following recipe to make the noodles.

Ingredients: Semolina 1/4 cup
                  Maida 1tbsp
                  Whole wheat atta 3 tbsp

Cooked noodles


Mix all the above with a little water to make a dough. Knead the dough for 5-10 minutes with a little oil to make a smooth and silky dough. Let it rest for 30 minutes or more. The dough should be stringy when pulled but should not stick to the surface of the bowl/rolling pin.  Then take a lemon-sized ball of the dough and roll out as thin as possible without adding any more flour. Meanwhile boil about three cups of  water.  Add 1 tsp of salt and a few drops of cooking oil. Now cut thin strips from the rolled out dough and put each strip one by one into the pot of boiling water. Cook on a medium flame for 5-6 minutes. These strips need lesser time to cook than store-bought noodles. Once cooked, drain the noodles and put in a bowl of cold water. When cooled, drain and set aside. Serve with stir-fried vegetables/seafood/chicken.

Noodles with topping of spicy corn and mushrooms

Monday, September 20, 2010

Almond Oatmeal Cookies

I have always been interested in baking cakes and cookies but until yesterday, I had not been able to bake the perfect cookie. They were either left uncooked or else they would turn out too hard and tasteless.  Yesterday, I decided to try baking some cookies for a little girl and found this amazing almond oatmeal cookies recipe online. I tweaked the recipe a little but the end results were amazing!!!


Ingredients:
Cooking oats - 1 and 1/4 cups
All purpose flour- 1/2 cup
Almonds - 1/2 cup
Sugar - 1/2 cup (adjust as per taste)
Vanilla extract - 1 tsp ( I used a pinch of fresh vanilla from the vanilla seed)
Butter - 1/2 cup
Salt- 1tsp ( do not add salt if using salted butter)
Baking soda - 1 tsp

Grind the almonds coarsely. You can also use blanched almonds. But I used them as they were and they gave a nice crunchy taste to the cookies.

Mix together melted butter and sugar until smooth. To make it easier, I powdered the sugar before adding in to the butter. Then add the salt, vanilla extract, and the baking soda. Mix well and then add the flour.  Mix well and then add the oats. Mix all the ingredients well to form  a sticky lump. Wet your palms and take spoonful of the mixture and shape them into cookies. Place them on a greased cookie tray taking care to see that there is space between the cookies as the cookies will rise and become bigger when baked.  Bake in a preheated oven at 200 degrees C for 18-20 minutes or until they turn slightly brown at the edges. Remove from oven and let the cookies cool as they tend to be slightly soft when warm. When cooled, they turn to be crisp but crumbly when bitten into. The above recipes makes about 30 cookies.

LinkWithin

Related Posts Plugin for WordPress, Blogger...